November 29, 2014

Heated Seats

My kids love heated seats - maybe it is just the lights on the switch. Every car time they get in the car during the winter, they go for the button! I never used them that much but can kind of see their point when it is super cold. So I thought, "My seats are being reupholstered, I wonder how hard it would be to add the heating elements to the seats?"

Turns out not that hard and not that expensive!

I did a little research and found a kit had everything I needed to retrofit my seats all for less than $70. The kit came with two pads for each of my front seats, switches, relay, cable and fuses. I ordered the kit and took the heating elements to the upholstery shop to be installed before putting on the new leather. 

Then I started working on the wiring. The switches could be mounted in the center console and had cool indicators for high and low settings. The thing is they don't look like the G-Wagon switches. Turns out if such things matter to you, the original MB switch will work. Vlad at Four by Four Club sells just about every switch made, but I could not find the seat heater switch. Turns out he sells a retro fit seat heater kit as well. For $185 he he will sell you a kit that does one seat. 
W460 Heated Seat Switches

I called Vlad and he sold me just the switches for about $75 each. Now you don't need these switches, but the mount in the dash with a little cutting and look stock. 

I tied in the power to the ignition so the seats only worked when the ignition is on because they can draw quite of bit electricity and leaving them on will drain the battery.

I finished the wiring, ran the cables from the dash, down under the center console to the seats. When the seats came in, I simply mounted the relay under the seat and plugged them in being careful to dress the wires so they were clear of all the moving parts. They worked real well.

Now on the cold days, I just reach up on the dash and the cold leather turns warm when it gets hot, I turn it down to the lower setting. Heck, I may even use them in the summer!

November 26, 2014

Interior Update: G-Wagon Doors

After getting all the materials for the interior, I decided to split the work. I removed the door panels, interior trim, floor matting and seats and installed the original seats in the car so I could continue to drive it. I decided take the Recaro Racing Seats, back bench seat and door panels to a local upholstery shop called Brent's Custom Upholstery while I focussed on the headliner, carpet and remainder of the interior panels.  

G-Wagon Door with Dynamat
With everything out of the car, it sounded like a tin can. One of my goals was to reduce noise so that meant treating the interior. With everything out of the car, now is the time. I ordered some Dynamat and Dynaliner to deaden the tin can sound and insulate from the weather. I know they Dyna products are expensive, but have used them in the past with excellent results. The Dynamat sticks great and the Dynaliner is a closed foam so it will not absorb or retain moister. 

For the doors I focused on sound deadening the metal and used Dynamat on the interior metal. I had the upholstery shop put 1/4" Dynaliner on the trim panel before covering them. I did this on all three doors. I also added some Dynamat on the interior of the outer skin. After adding the Dynaliner the doors closed with a solid thump. They now sound like, well... a Mercedes.

Vapor Barrier on G-Wagon Door
I had decided to upgrade the interior but keep the general feel of the original design. I did not like the checkered fabric so that was going. I did like the utilitarian look of the older G so there would be no dramitic upgrades toward a 462 look. My wife and I both agreed the Recaro seats looked strange but they felt great. The original front seats would be sold on eBay. So the interior trim panels would be covered entirely with MBTex with stitching to match the seats. 

I noticed that the interior of the trim panels showed some marks caused by water. Most new cars place a water barrier between the inside trim panel and the door. I cut thick plastic sheeting so size, taped off the edges and sprayed the interior of the door and the plastic sheet with 3M 80 Spray Adhesive. Once tacky, I applied the plastic to the door and allowed the plastic to hang on the inside so any water would just drain out the bottom of the door. 

Then I mounted the interior trim to the door, replaced all the hardware and mounted the pocket. the pockets were cracked and did not look so good, so I asked the upholstery shop fix the cracks, cover them with the MBTex Vinyl and add matching stitching along the top of the pockets. I could have done all of this myself minus the stitching, but I wanted them to match the seats. 

I could have left the locking door hardware off since the doors automatically lock when I start the car, unlock when the car is turned off and I even have an interior power lock switch. I decided that the hardware to manually lock and unlock the door should be installed but decided to ditch the red hardware and get black hardware to match the rest of the interior.

Covered G-Wagon Door Pocket
Now all three doors look great, keep the cold out and sound great when closed. There is a noticeable reduction in road noise. The biggest surprise was how the cold air was kept out of the cabin. I did not realize how much cold air was leaking through the doors. I love the classic and updated look and know water will not be a problem on the recovered panels.  


November 15, 2014

Keyless Entry

After getting back to Park City, my daughter and I went for a ride and she asked what I was doing putting my key in the door. I really never gave it much thought because all of my other classic cars don't have keyless entry, but I was using this as a daily driver. It is really kind of a pain unlocking each door. 

That got me thinking, how hard is it to install keyless entry into a car? The door panels were already off to lube the windows and so they could be recovered. How hard would it be? Turns out, not that hard at all. Here is what I did.

First you need door actuators. Basically these are push/pull devices that hook up to your door locks, mount to the doors below the locks and push up with a positive 12V DC power and pull down when the polarity is reversed. heavy duty actuators are really not that expensive. Universal Car Power Door Lock Actuator can be purchased on Amazon for as little as $5.00 each.

The thing is, you will still need relays, inside switch and if you want it to be remote, a radio receiver and dongle. Turns out, there are some alarm options that provide the entire kit in one package. Two dongles, a receiver, 4 actuators and even an alarm. I selected the CrimeStopper SP-101 Car Security Alarm & Keyless Entry System with (4) Car Power Door Lock Actuator Motors form Amazon for about $45. I also got 6 SPOOLS 100' Feet 16 GA Gauge AWG Primary Remote Wire Auto Power Cable Stranded from amazon to run to each door. 


Bellows on Driver's Door
The hardest part was not mounting the actuators, it was getting power into the doors. My front doors never had power so there is no accordion to run the cables. This meant creating a 1" hole on the door and the jam, priming and painting it then installing an accordion. Euro Truck Importers sells the Mercedes Door Wiring Bellows PN: 1238210697 for about $5.25. That allowed me to run the two wires into each door for the actuators. For the back door, I just snaked the cable through the existing wiring harness. 

It was very easy to install the actuators. I pulled off the door handles by removing the bolts to expose the lock. There I just attached the clamp that came with the actuator on the end of the locking plate. It took some work but it just fit. Then I installed the rod and mounted the actuator near the bottom of the door, drilled two small holes, primed and painted the holes and mounted the actuator on the inside of the door. I tested the actuator with a 12V DC supply before moving onto the other doors.


Wiring Diagram for Alam and Power Locks
I then installed the keyless controller behind the panel next to the ignition switch and added an Installer Essentials Dual relay behind the glove box to control the power locks. I wired the alarm to the L&R parking lights and even came up with a way to have the dome light come on when unlocking the car. This required and additional relay and a diode. (See diagram) I was able to tap into all of the wire I needed to access from the fuse box under the dash on the driver's side. I installed a new fuse box for constant 12V DC behind the glove box for the alarm, power locks and new subwofer amp. The alarm siren was installed under the hood on the drivers side. 


Behind glove box, showing sub amp and lock relay. 
When done, I ran wires under the carpet from the front of the car, along the lower door jamb, up the side pillars, through the side of the car to the rear door. I also ran new speaker cable at the same time for the rear speakers. The controller for the alarm was installed behind the dash panel near the ignition switch and the door relays behind the glove box. I found letting the antenna from the alarm hang down under the dash extended the range of the keyless entry. I repurposed one of the spring switches in the dash and use it as an interior lock/unlock switch. Make sure this is a spring loaded switch as leaving the locks in the locked or unlocked position will drain your battery and burn out the actuators. 

I'm SOOO happy I did this. Now it is easier to find my car in a large lot, easy to unlock all the doors and they automatically lock when I start the car! Most importantly, my daughter does not look at me strange when I unlock the car!

Interior Update: G-Wagon Carpet

Interior G-Wagon
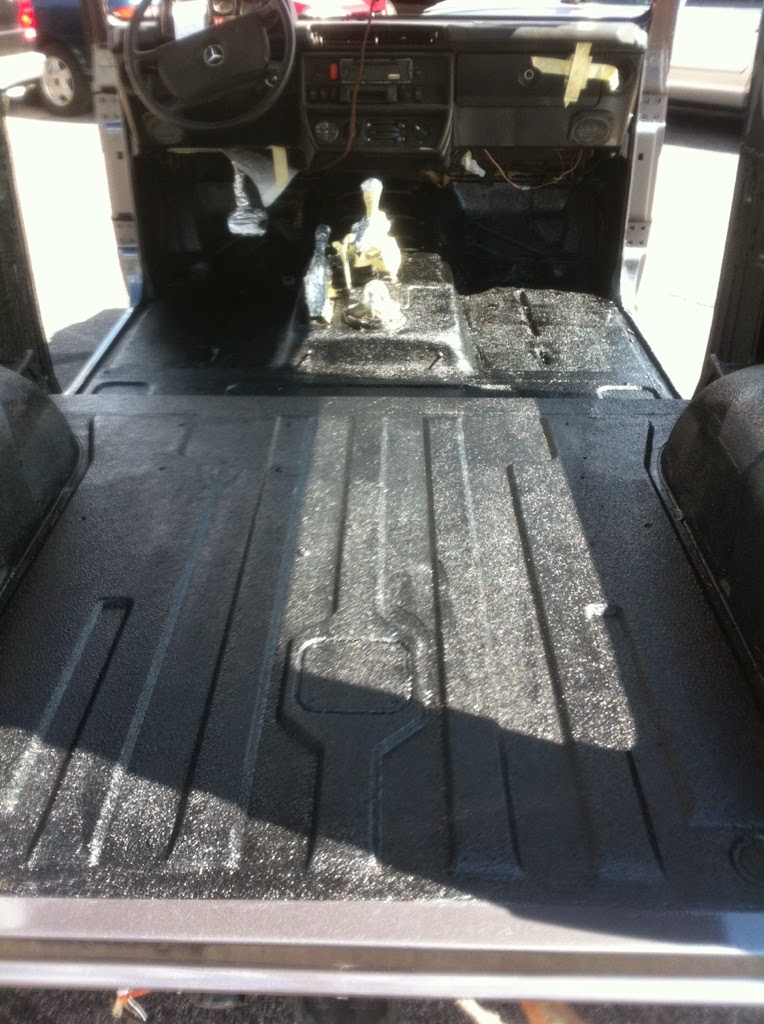
When I got my 300GD, the previous owner had removed all the vinyl interior floor covering and painted the floors with what looked like bed liner. It looked pretty cool... but (and this is a big but) it was LOUD. On long drives, it was also kind of hot underfoot. Pretty cool for 4-wheeling with your buds on the weekend, but for a daily driver, it is a non-starter. 

Something had to change. For me there were three issues:
  • It had to isolate and reduce cabin noise
  • It needed to better insulate the interior from heat and cold
  • It needed to look better
I had already decided on going to MB colors from the 80s and picked up some German Wilton wool carpet from Veteran Company in LA so the decision for the top layer was set. What was needed next was provide a good foundation before laying down the carpet.


Dynomat and Dynoliner
Dynamat with Dynaliner Padding Partially Installed
Since the interior was already out I started by covering the front starting at the firewall and continuing under the front seats with a layer of Dynamat. This is a great sound deadener and heat shield. I cleaned the surface with alcohol to make sure the Dynamat would adhere to the floor. I then cut it to size, removed the backing starting from the front, lined up the product and continued to pull the backing off as I worked toward the back of the car. I used a hard roller to make sure the Dynamat made contact with the entire floor surface.

Like when I covered the doors and roof, this made a huge improvement in the "tin can" feel of the car. It seemed more solid and muted the sound of the engine and transmission. It also was an excellent heat barrier. There was still more to be done. 

Before installing carpet, I needed to put down some padding. Once again, I used Dynaliner. While just about any foam or padding would work, a nonporous material is best used in a car. If padding or carpet gets wet and can absorb the water, it will sit against the metal and start to rust. Wet padding is also prone to mold and mildew. While Dynaliner is expensive, it uses a closed cell foam with a very good self-adhesive backing.

I applied Dynaliner everywhere there would be carpet. This included the firewall, floors of the passenger area, the center transmission hump and the rear wheel wells. This dramatically reduced the interior noise in the car. Engine noise was reduced, as was the transmission wine and the sound from the rear wheel wells.

I then used the original vinyl floor mats as templates to cut the carpet. I placed each carpet piece in the car to make sure the fit was perfect. Then I had the edges of the carpet that would be exposed bound so it would look nice and would not unravel.


Once complete, I applied a coating of Scotch Guard to all the carpet. Then I put a coat of 3M Hi-Strength 90 Spray Adhesive to the surface for the Dynamat and the back of the carpet. Once tacky, I started to apply the carpet. Carefully cutting holes where seats, console and seat belts would be mounted. I then screwed in the door sills and mounted the seats.

While no serious 4x4 would have carpet, in my case the carpet absorbs and isolates cabin noise, looks nice and compliments the rest of the interior. While the W460 may not have come with this type of carpet, it is consistent with the color and type that was delivered on MB cars in the 80's so for me it is in keeping with the period and a nice upgrade. Now that the work is done I am a practical realist, so there are some pretty heavy duty floor mats protecting the carpet!         

November 14, 2014

G-Wagon Tunes!

Early G-Wagons suffer from a lot of cabin noise so getting a good music experience is really difficult. The first step is to reduce cabin noise (see other posts), the second is to get a good stereo that will overcome the noise and provide good balanced sound. 

My brother Paul and I used to run a couple of high-end stereo stores in Atlanta so I've got a little experience with car sound. The first thing you need to know is, unlike cars made before 2000, most modern cars have really good sound systems. The second thing is getting good sound into older cars does not have to be expensive if you do a little DIY. The final and most important thing is to make sure you design the system for the interior of the car and what it needs to do when the car is running. That means listening to speakers in a showroom may not be the best idea.

For any car, the system should be more bass forward than a home system to have a good experience in a running car. That is because the rumble from the engine and road noise provides a lot of low frequency interference. Your ears will start to ignore that sound so your stereo will need to be able to overcome that low end noise and make up the natural attenuation of your ears. Listen to any car system with the engine off then go for a drive and you will see what I'm talking about. 

From the factory, the early W460 has the ability to support 4x6 speakers. Two in the rear pillar and two in the kick panels up front. Frankly, I don't believe 4x6 speakers will cut it. A previous owner had installed 4" speakers in the lower part of the dash on each side, not unlike what Mercedes was doing to just about every car in the 80's.

After pulling all the interior out of the car I decided that the rear pillars could take a 6.5" component speaker system, and I could add two more 6" dedicated woofers in the front kick panels. I decided to change the head unit to support Bluetooth music, had an output for a subwoofer and kept with the German theme. That meant Blaupunkt, although you can choose any single DIN stereo. Another G-option are head units from VDO.


The rear pillars were very easy to put the 6.5" component system. Since I was recovering the interior, I simply cut the holes making sure to have enough clearance then cover with MBTex. The thing about the rear pillars for speakers, is that the cavity behind the speakers rings like a tin can. Without deadening the metal and putting in some sound treatment, any speaker would not produce that solid bass or clear midrange needed for good sound. Do you have a W460 handy? Go back and knock on the outside next to your rear door. Hear that ring? It needs to GO or your stereo will not thump!

Like the doors and roof, I covered the entire rear pillar exterior metal with Dynamat and Dynaliner. I also stuffed it with Fiberglass prior to installing the panel. After applying the treatment, the enclosure was solid and as dead as any quality speaker cabinet. 
Rear Pillar Stereo Speakers

Then I mounted the component speaker system in the rear pillar area making sure to place the tweeter high enough to clear the back seat. For the rear speakers I selected the Kenwood KFC-P709PS 6.5-Inch Performance Series Component Speaker System for about $60. The woofer of this system is not very deep and that is important because there is not much clearance there. Mounting the speaker lower provides better clearance, but even then I needed a spacer ring to make it work. For that extra finished look, I painted the grill of the woofers to match the trim of the car. 

I put an inline capacitor in the existing Kicker front speakers to keep the bass that the speakers could not reproduce anyway from overloading the speakers. With a 4 ohm speaker, I decided to use a 200uF 100V Non-Polarized Capacitor that would roll off at about 3db per octave starting just under 200 HZ. Not only would the reduction of bass signal going to the speakers allow them to play louder without breaking up, it would eliminate any potential low frequency phase issues with the near by woofers installed in the kick panels. 


Subwoofer in Front Kick Pannel
Then I got a couple of $50 6" woofers and installed them in the kick panels. That required some cutting into the metal behind the kick panel. Cutting the thick steel ended up being the hardest part of the entire job. No wonder these cars are so heavy. Additional sound deadening treatment was installed behind the kick panels.

I installed a $40 Pyle PLMRA120 2-Channel amplifier on the back of the dash just under the glove compartment. I took the subwoofer output from the head unit, split it with a Y connector and sent it to both channels to the amp. I routed the amplifier power from a new constant 12V fuse box installed behind the glove box and the trigger power from the head unit. 

I chose to use the Blaupunkt Toronto 420 BT head unit as it had plenty of power to drive the front and rear speakers, two USB ports with iPod support, CD player, and Bluetooth all for less than $150. I installed to to the existing wiring including a trigger for the dash lights so the Blaupunkt would dim at night.

After it was all done, It took a while to tune the parametric EQ and subwoofer output but once adjusted the final system plays nice and loud, has clear highs and nice bass. Most of all, it looks pretty nice.

Most folks really don't care about a nice stereo on an older G-Wagon but this is my winter daily driver, and I needed my tunes. The bonus was that only $300 the entire system came in well under my $500 budget. 

November 6, 2014

Interior Update: LED Lights

One of the most distinctive aspect of older cars are the analog gauges they use. In the G-Wagon's case, the exterior has not changed at all since 1979, but like every other car, the interior has been updated. Many will say, the greatest advancements in auto design over the last 50 years has taken place in the human interface. I really like 70's style VDO gauges in the early G-Wagons but like just about every classic car, they are really hard to see at night. Most modern cars have advanced illumination that utilizes Light Emitting Diodes (LED) or Cold Cathode Fluorescent Lamp (CCFL). LED and CCFL are a much whiter, brighter, more efficient and cooler light source than the incandescent bulbs in the older G-Wagon dash. 
T5 Dash Light LED vs. Incandescent 
In most cases, upgrading lights in the dash to LED is as easy as finding the correct light and simply replacing the old lights with the new. In the G-Wagon most of the lights are pretty easy to install, but some require a bit of work. Most folks will want to do them all at once so the whiter color will not stand out against the yellow color of the old bulbs. 


Replace the old incandescent bulb with an LED version arranged as a Surface Mount Device (or SMD). The lights are inexpensive and easy to find. Simply search online for SMD and the bulb type: like T10 SMD. When ordering remember the bulb type refers to the base and not the amount of light or the configuration of the bulbs. Make sure what you order will fit! How much are they? Prices are falling fast but a 10 pack of SMD T10 can be had for about $11.

There are basically 3 types of bulbs used in the interior of the early G-Wagons:

T10 - Large Bulbs for Dash - 2 in the Speedometer, 1 in the Odometer and as parking lights in the Euro headlamps. (More on hi/low beams later)


T5 - Small Bulbs for Dash - 4 used in the climate control console, 2 for illumination in the dash combo cluster 


23312 - 2 each in the dome lamps and also 3 used for the license plate


1156 - Used for Backup Lights


Rear W460 Cluster with Bulb Locations

NOTE: The T5 and T10 are also used as indicator lights. In some cases like the charging light, the indicators use the resistance of the bulb to function properly. LED lamps use much less energy so they have much greater resistance. Additionally if you use them for things like the blinker, they are so bright they can be distracting. I would recommend resisting the temptation of going overboard with the LED replacements and stick to bulbs used for illumination. 


LED NOTE: LEDs are based on diode technology. That means that, unlike incandescent bulbs, LED lights are polarity sensitive. If you install them backwards, they will not work. If you install an LED and it does not work, simply remove it and turn it around. 


Don't install any of the bulbs with the power on. Turn the source off first, install the bulb, then test. You won't electrocute your self, but you will be replacing some fuses!


Most of the bulbs are very easy to get to and replace. You don,t have to remove the gauges but if you do, simply push from the back and they will pop out. The T10 Bulbs for the speedometer is very easy to replace. Simply pull the socket from the back of the gauge and pop the bulb out. Make sure you put the socket back into the guage for testing because it grounds only when installed.


The T5 bulbs used in the fuel/temp combo gauge that are mounted in screw off sockets and are MUCH harder to swap out. Also a bit more difficult to find is the shifter bulb that is used to illuminate the fiber optic spider assembly. To replace those with LED lights, you will need to modify the bulb to work. 

The dome lights may be the easiest to install so that is a good place to start. Simply pry off the dome light from the side opposite the switch. Remove the existing bulb and install the new one. DONE! Now you can really see when you open the door. 


Modified T5 LED Dash Bulb
On the combo gauge, start by finding taking the black socket and turn it clockwise until you can pull it out. You will not have to remove the gauge to do this. For the cluster lights, you will need to remove the T5 bulb from the socket. This is really hard to do without breaking it. use rubber gloves to glove for better grip while gently rocking the bulb side to side while pulling. Don't use tools because the bulb will break and it will be very difficult to remove from the socket. 

If you try to simply plug in the replacement T5 bulb you will find it does not work. I had to modify the bulb by wrapping and soldering thin solid copper wires to each side of the bulb. Even if you are very good with a soldering iron, the bulb may now be thick too plug into the socket. Take a file and carefully file off the excess solder and some of the thin wire on the flat side. Make sure not to cross the leads on the same side of the board. Test your work with a 12V source PRIOR to installing in the socket and again after you pul the bulb in the socket. 


Now you are ready to put the bulb back into the cluster. Repeat this process for all both socketed T5 bulbs you are using. 

Complete LED Dash Upgrade
My W460 has parking lights in the Euro headlights. The LED lights look great in there but are a bit difficult to replace. Remove the headlights, from the car and take them to a work bench. The sockets may have been sealed with silicon glue. Carefully cut away the glue until you can remove the socket and the T10 bulb. Put in the new LED bulb and seal with silicon glue. You may need to trim away some of the metal if your bulb is large.

If is very easy to replace the 1156 lights in the backup lights. This provides a brighter, whiter illumination when backing up. Simply remove the two screws on the rear lights and install the new bulb. Remember, if it does not work, remove the bulb and turn it around. 

Another upgrade was replacing the license plate lights with the same lights I used in the dome. The only issue is, they are so bright that the license plate was too bright for me. So I only use the center of the three bulb and leave the other two empty. 

Once you replace all the bulbs everything will look great. The bonus is these lights use a LOT less power. So if you leave your door open, dome light on, or even the parking lights on -- it will be a LONG time before you drain a fully charged battery. 


Enjoy your updated look and try not to stare at your great new dash while driving at night. KEEP YOUR EYES ON THE ROAD.

November 1, 2014

Interior Update: G-Wagon Headliner

Waiting for Repair
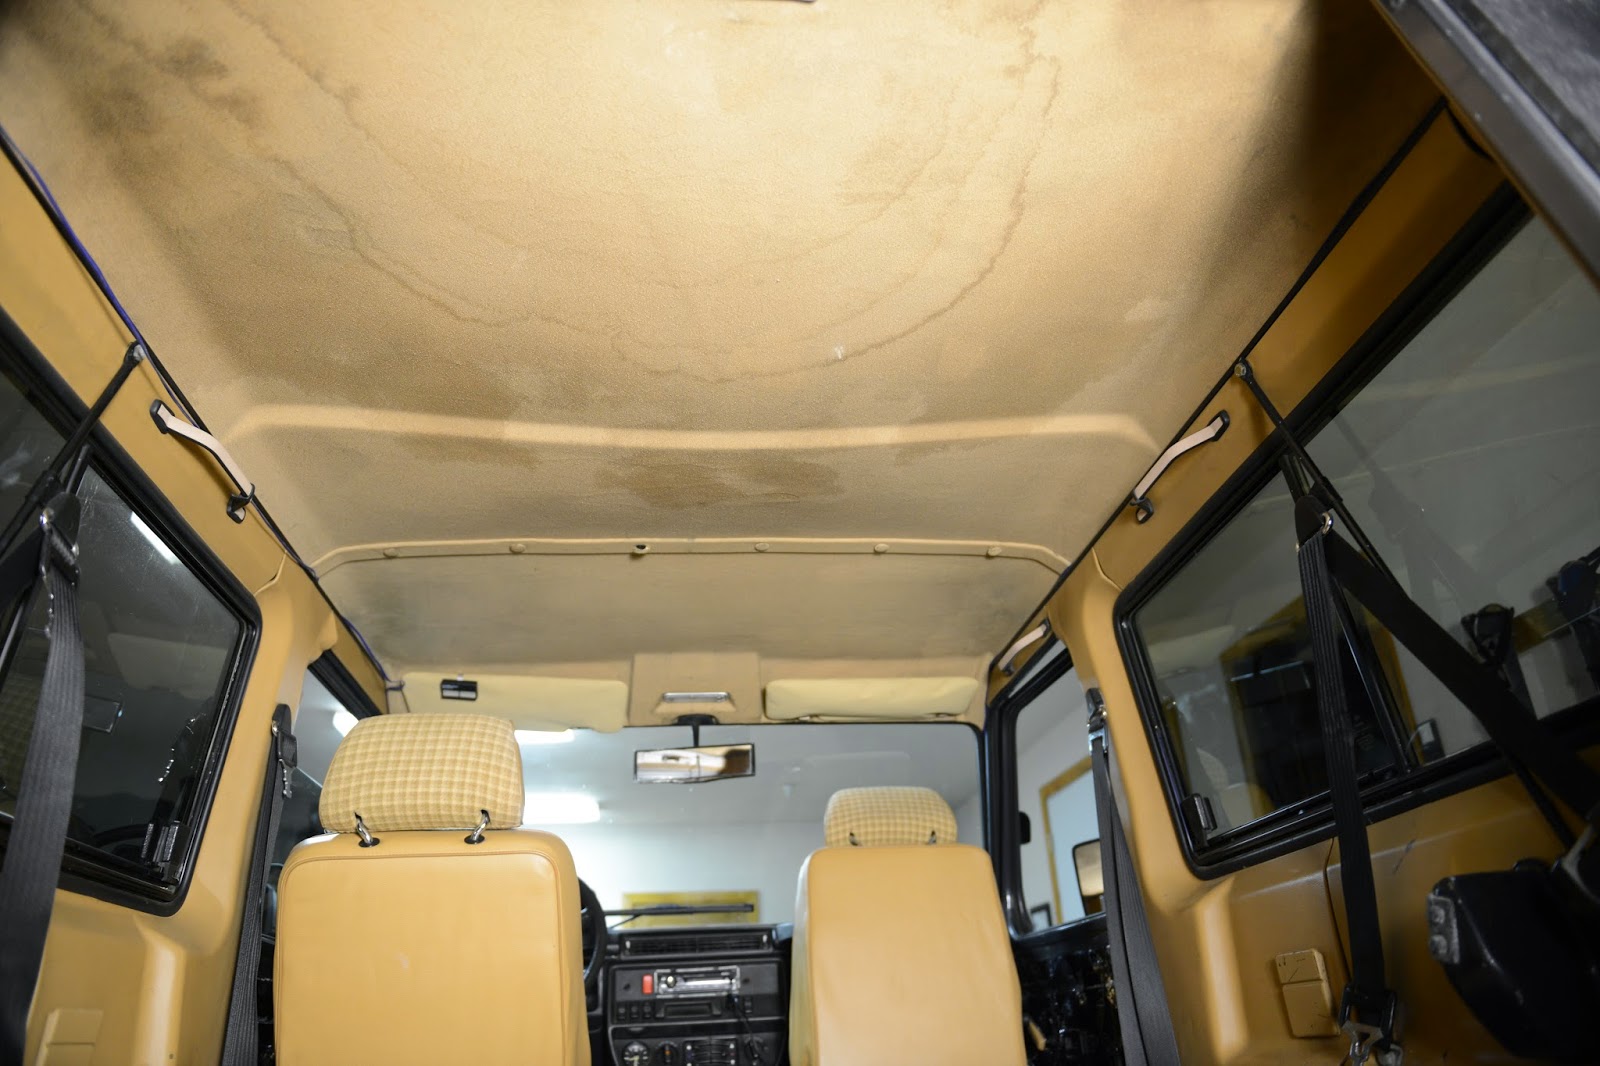
Original Stained Headliner
When reconditioning the hard top on my R107 280SL, there was TONS of info on the web. For the G-Wagon - not so much. 

Probably the worst part of the interior of the G-Wagon was the interior head liner. It was badly stained, had wires hanging out and was sagging horribly. I know there is a problem with the sagging on the SWB headliners, but this one was beyond acceptable. 

The headliner is very easy to remove and recover. Easier than most Mercedes-Benz headliners. Just about any headliner fabric or vinyl will work. I had already removed all the interior trim, but I don't think that is necessary if you only want do to the headliner. To remove: 
  • Remove the dome lights from the back and front. Simply pry them out from one side, carefully remove the power cables and set the lights aside.
  • Remove the push clips along the top where the two pieces meet. These are expanding push pin type clips and will be very brittle. So pry the center push part out then you can remove the expanding part left benind. 
  • Then open the back door and push the rear of the headliner up and over the trim lip above the rear door.
  • Do the same for the sides and pull the headliner out the back of the car. 
  • Remove the sun visors.
  • Then lift the front part up so you can remove it from the lip on each side. 
  • Pull it down in the back and toward the back. 
  • Remove it out of the rear door as well.
Once my headliner was out, I carefully removed the old fabric from the headliner by pealing it off. The headliner looks to be made from a mix of foam and organic materials that is molded to fit in the G-Wagon. The material looks like it would provide good insulation from the cold and isolate sound. I could see where water had damaged the material and caused the rear portion to sag. By wetting the back portion and soaking it with wet towels, I could get it to respond to pressure. I placed it in a room with heated floors with towels on the edges and placed a heavy weight in the middle. I let it sit that way for a week to restore the original shape. 


Waiting to be installed
After that, I used the old material I had pealed off to cut the new headliner vinyl material MB41TAN to size, being careful to cut it large. I then sprayed 3M 80 Adhesive on the top 1/3 of the molded headliner and the vinyl. After tacky, I started working from the top middle toward the center. Then used a pressure roller to make sure it stuck well. Then I did the next 1/3 and finished off the final 1/3. After I was done, I used a razor blade to trim the excess.

I repeated the process for the front portion. Here I also used a heat gun to make sure all the nooks and crannies were properly fitted. I clamped down the parts that would not stay and let them sit overnight. 

While they were setting, I noticed the top of the car rang like a tin can. Even after treating the doors, there was a resonance to the car when closing the doors. This had to stop. I used Dynamat to treat parts of the car roof until the ringing stopped and knocking on the roof gave me a nice thud rather than a ping. Some folks cover the entire serface with Dynamat, but I did not think this was necessary because the headliner was so thick that it would give plenty of insulation form the cold. I also removed the dry rot foam between the roll bar and the top and replaced with with silicon calk. 

I then reversed the steps I used to remove the headliner to install it. Slide it in from the back, push up in the middle to get it to pop into the ridges. While I was up there, the front dome light would not turn on manually, so I removed the jumper going to the switch and grounded one side. Now I can manually turn on the front dome light with the integrated switch. I also ordered new large push pins from EuroTruck (WOW THEY ARE EXPENSIVE). The now headliner looks great and as a bonus I now had that new car smell. You can still see a little sagging in the back but not as pronounced as before. Super happy and not an expensive upgrade. 


Recovered and Repaired Headliner Installed 


September 27, 2014

The Interior Plan

I was excited to show the 300GD to my daughters just as I arrived from Portland. As soon as they saw the car, they thought it was cool until I opened the door. I must admit, it looked pretty bad. The headliner was stained and sagging, the seats were stained and worn, the vinyl was falling off and the doors looked horrible. I had put the original flooring back in to reduce the road noise and it did not look good either. I had purchased the car knowing the interior had to be redone and after a quick oil change and complete check out at Muller’s Burbank Mercedes we started our interior plan.
Rear Headliner

A local upholstery expert told us about Veteran Company and said they had the largest selection and best prices in Southern California. My wife and I collected Apollo, our Yellow Lab, and drove to downtown LA to check it out. 

Veteran has a new location in a nice clean building about a block off of Skid Row in Downtown LA. Not the nicest neighborhood, but as we soon learned, it was worth the drive. They have everything IN STOCK!

If you have a Lab, you know they shed. My MGB and 280SL both have black interior and every time my dog gets in the car, it takes weeks to get the hair out. So when the salesperson asked what color, I pointed at the dog and said, "that color."

They pulled out books that had colors that Mercedes used in the mid 80's and I found the color we were looking for. Turns out it was very close to the color of the car. The color we chose for the interior was PA950 Palomino Biscuit in what is now called MBTex. I would use this vinyl for the interior, doors and rear seats. It looked almost exactly like what was in there, only newer. For the front seats we purchased leather called Biscuit Reno. It matched the PA950 exactly and would wear longer and breath better and not be sticky in the summer.
Headliner, Carpet, Leather and MBTex Vinyl

I decided to use vinyl rather than the original cloth on the headliner and selected an MB41TAN that Mercedes used during that period. It was a bit lighter in color and thinner than the MBTex but looked great. This was a hard decision for me because I know the foam backed cloth would absorb more sound and reduce noise but the vinyl looked great and would be easy to clean. As a bonus, it matched the sun visors. 

Here is where the purists will start getting angry with my choice. To reduce noise and provide better insulation from the cold, I decided to carpet the floor. I know, no self-respecting 4x4 would have carpet. My last jeep was a thick rubber-like vinyl and I could hose it out any time. But I'm getting a 4x4 to navigate the snow not to take to Moab and pull Jeeps out of ruts. So we went with the German Wilton wool carpet and stuck with the Palomino color. This proved to be the most expensive item. 

The guys even tossed in half a yard of black PA7500 MBTex to cover the center console. that way the console would match the dash and have a more finished look. Total bill was about $800 for everything.

Now I need to decide if I want to use the original seats of go with the Recaro racing seats. 

September 18, 2014

Portland to LA

After purchasing the car, I had a decision to make. It would eventually end up in Park City, but my family was in LA and I've found a great MB shop in Burbank. Plus getting interior work done would be easier in LA and believe it or not, less costly than Utah. So LA it is, should I drive it or pay to transport it. 

Other than the tires being old, it seems to be in good shape,lets drive from Portland to LA. It was not too late so I started out driving south out of Portland toward LA. The plan was to stop and spend the night. 

The car was VERY LOUD. The seller had loaded me with with all the interior trim and extra seats but there were no matts on the floor, knobby tires and a diesel. LOUD! When I stopped for the night, I put in some of the heavy floor padding in the passenger and driver floors and that seemed to help. 

The car was SLOW! While I could push it to 70 MPH the RMP went well over 4000 so the fastest I felt comfortable going was 65. It was raining anyway, so 65 worked for me!

Other than that, the Recaro seats were comfortable, the car drove straight and the suspension was tight but comfortable. One strange thing though, once the car warmed up, it was HOT inside. Even with the temp control all the way down, it would blow hot air. There was also a lot of heat coming through the firewall. 

If you have ever driven the Oregon coast you will know there are mountains to climb. The OM617 would kick down and while I could pass the 18-wheelers, everything else flew past me. The temp gauge would also creep up. 

Once I was sure everything was running OK, I put in some in ear isolation headphones, put on a California playlist, cracked the windows and completed the drive. 

Just outside LA I was able to fill up with my first tank of biodiesel. The 300GD basically ran the same. NICE!

Conclusions from my first road trip:
  1. When redoing the interior, attention to sound and heat isolation will be a priority.
  2. In LA - the rest of the floor mats are going in until I get the inside redone. 
  3. Long road trips are not going to be a frequent occurrence with this car. 
  4. Gotta get a new stereo!
  5. What is with the heat?

September 17, 2014

Congratulations you have WON!

After a long search, I found a G-Wagon SWB on ebay, contacted the seller with some questions and found out the car had a OM617a Turbo in the car - COOL. I decided that the car was worth about $15,000 to me and won the auction for a bit over my budget at $17,000. My feeling the seller would not get top dollar for the car because it was so far from being original. that does not matter to me because I'm not looking to restore, collect or show the car. I just want a winter driver and the OM617a turbo would be well suited for local driving with better gas milage and better altitude performance than the 280GE M110 and as a bonus, I could run biodiesel. The 70 MPH top speed of the OM617 is not a problem for me because I'm not planning on doing much highway driving. 

I've purchased cars on ebay before with mixed results and have come up with simple a plan based on trial and error to minimize the risk after winning an auction.

1. Go see the car in person 
2. Ask for records
3. Check the car out - NO RUST
4. Be prepared to WALK

I purchased a one way ticket on Delta from SLC to Portland, took the train to the sellers home arriving before him and started checking out the car. I could always use SkyMiles to purchase a ticket back to SLC if the car was a mess. One thing was against me, it was raining that makes checking out a paint job almost impossible but as a bonus, it would make it easy to find interior leaks.

The body looked to be in very good shape, surprising because early G-Wagons are prone to rust. The passenger floor board had been replaced, the metal used was thick as the original but the workmanship was solid. The owner painted the entire floor of the car with some sort of textured truck bedliner. The exterior paint job looked to be very nice, trim and most interior had been removed for the paint job. Using a magnet I could tell there was no bondo body repairs. Of all the body parts, the hood was probably the one part I could see repair work and it was welded and sanded where the MB badge should be. The original color had been Gold, the new color was a MB Onix that covered the previous camo paint job - NICE! There were no dents. 

I was very careful checking the body because I've been burned before. Body work on old cars can be VERY EXPENSIVE. I've since developed a first name relationship with my local body shop when restoring my 280SL, and hence my new mantra: no tolerance for rust. 

OM618 Turbo
Checking under the car, I could tell there were leaks on the front and rear boots to the transfer case. There was absolutely no signs of rust under the car and under any of the wheel wells. The leaking boots were confirmed by maintenance records. The engine carpment was clean and the OM617 Turbo looked to be in good shape. The owner said it had 135,000 miles when installed and it was from a 300 California Diesel. Some seeping of coolant but no oil leaks could be seen. the engine was stone cold and had not been cleaned in some time. All good signs when purchasing a car because you want to test a cold start and see if there is a history of any leaks.

The car had a rebuilt automatic 4-speed transmission that was designed for the G. While all MB automatic transmissions from the 80's are very similar, the G trannys vent from the top to keep water from entering the transmission while traveling through deep water. It is also good is a concern because the OM617 equipped 300GD usually shopped with a 4 or 5 speed manual and the automatic for the 280GE had different gear ratios than the auto equipped with the 300GD.

The wiring under the hood looked like it was done by an amature. From this I could guess more electrical problems would be found over time. There was actually a relay just hanging out on the passenger side of the car that had not been mounted. What was that for? Turns out it was the starter relay! 

As expected the interior was a MESS because the owner told me over the phone that the interior needed to be redone. He was 100% correct. Old Recaro racing seats had been installed and they were dirty and had foam issues. The dash was in pretty good shape but the center console for the factory air had been removed leaving a gap between the floor console and the dash. The center console was cracked with holes and glue marks. The headliner, doors and the entire interior basically needed to be replaced or recovered. One of the door pockets was cracked. All the floor mats and door sills had been removed exposing the floor. I could see water leaking into the interior in the front that probably caused the floor rusting out and some leaking near the rear windows. 

Spare Recaro Seats
The owner left the keys, so I turned on the ignition, the glow plug heater light, charging light and oil light all illuminated and the glow plug heater light turned off. I started the car and it cranked up and ran a little rough but after a minute or two than idled smoothly. All the lights worked, the combination switch (wiper, turn signal, high beam and washer) worked but was very loose. The aftermarket radio worked but the installation job was very poor and from what little I could hear over the loud engine, sounded like CRAP. The heater blower worked at all speeds. The glove compartment would not stay shut. 

I was impressed that the glow plug light and the tachometer were replaced to support the OM617a engine when the modification was done from the W110. I also liked the upgrades to the air filter. It appeared the exhaust was not upgraded to the larger size to support the turbo OM617, a reducer was placed before the old 280 M110 exhaust. My guess is the original 280 exhaust would prove to be too restrictive for the turbo to do it's thing. Note: OM617a Turbo should have a 3" pipe with one muffler. 

The owner had installed a dual battery solution to support the large Winch with a dash mounted disconnect switch and relay. Once again the wiring was a mess. One battery was from this year 2014 and the other three years old. Both were the yellow deep cycle Optima batteries - a good choice for the winch but otherwise not necessary for a car with so few accessories.  

The large off road tires had plenty of tread life but were over 10 years old. When purchasing old cars that are not driven much, make sure to check the date stamp, there is actually a code on the tire that will tell you how old they are. Ever found an old rubber band and when stretched it just breaks? The same thing happens to old tires. If the are over 10 years old REPLACE THEM, including the spare. 

The owner did have the original front seats, the rear bench seats, the floor mats, door sills, a very large winch, and excellent records from the previous owner and since he purchased the car. The original seats need to be reupholstered but otherwise in good shape. I'm guessing the chassis and body had about 150,000 miles on them probably about the same for the engine. 

A quick drive showed the car started in second gear (typical 4-speed auto transmissions) but kicked down quickly. Acceleration was pitiful (0-60 in 30 seconds) but when the car got to 2000 RPM the turbo kicked in and zoom! Pretty cool! The speedometer looked to be inaccurate and the odometer was not working at all. All things I could fix. 

My summary was the body, chassis and engine were in very good shape. The interior needed to be redone but I knew that going in. I would have to clean up the wiring and tweak some of the instrumentation. Here was my thinking:
  • I could redo the interior myself, and have the seats reupholstered. Total cost about $3000.
  • The wiring would need attention but once again, I could do that myself for less than $500 in parts.
  • The front axle outer gaskets needed work on the front and back $1000.
  • Some lights and trim were missing, probably less than $500.
  • New Stereo $500 (I'm a magic man here)
  • I could sell the winch and one set of front seats to offset some costs.
  • New Tires 
I decided to go through with the purchase and drive it to LA where my daughter and wife were spending the summer to have my rock star MB mechanic give it the once over and start work on the interior. Besides, there is no place like SoCal to restore a car!

September 1, 2014

Why the G-Wagon

We have a couple of older convertibles, a 1967 MBG for me and a 1984 280SL that ex-wife abandoned. I have no trouble driving either of these cars just about anywhere, the thing is, I live in Park City. Yes, the ski town, 350 inches of snow a year. Driving a 1967 MG on a salted road is like putting a sugar cube in hot coffee. The body will just start dissolving from rust. This means I need a winter car.
Ruby and Beauty

When I was looking for the R107 280 SL, I kept running across this thing called a 280GE. It was this very cool jeep-looking 4x4 designed and sold by Mercedes-Benz. They still sell these beasts, but they cost over $100K. The older ones were coming up for anywhere from 7K-20K depending on the shape of the car. 

I also kept seeing the G-Wagon mentioned when doing research on the R107. They kept saying the W460 was the second longest manufacturing run of any MB model except the G-Wagon. The more I looked into the W460 G-Wagon, the more I liked the idea of using one for a winter "beater" car. 

I started looking for a manual 5-speed, short wheelbase, 280 (dual overhead cam 6 cyl M110 engine) because it is basically the same engine I already had in the 280SL. I have really come to appreciate the M110 as a high revving, powerful, great sounding, bulletproof, fuel injected straight 6. Turns out, that was no easy task. MB never sold the W460 in the states and the 280GE is almost impossible to find in anything other than an automatic 4-speed. I did find a 280GE that had an OM617A Turbo engine in it. That is intriguing, a 5 cylinder, turbocharged diesel - humm. The OM617A and non-turbo OM617 both have an almost cult following as a rugged diesel that has been retrofitted into everything from Jeeps to generators. My tractor has a diesel that I have been maintaining for 5 years, but it is loud. 

On the example I found, the exterior body had been repainted, but the interior was a mess. Also whoever did the electrical work, needed a serious course in how to run wires and connect wires. 

It appears that car was imported into Georgia as a 280GE, painted camo and used as a hunting car. It was rescued from the torment of a bad paint job by a 4x4 enthusiast in Oregon who did an excellent job updating the body, installed the OM617A turbo and used it part time to hit the trails in the Pacific Northwest. 

Over the next few months, I'll share the journey I'm taking with this most iconic 4x4, and show how I brought the interior to the point where I could use it as my primary winter transportation in the mountains of Park City, UT. Stay tuned - the journey begins.