September 21, 2016

The Turtle - W641 Puch 300GD

I had to sell the W460 featured in this blog because I had too many cars here and needed some quick cash. I listed it for what I considered a fair price with 3 other cars and got a ton of calls for the 300GD - the other cars, not so much. Short story, in 24 hours the 300GD Turbo was sold.

I missed driving my 300GD Turbo SWB so much that it was not long before the bug hit me, and I started looking online, not really to buy but just to look and see what was out there. After a while, I thought it would be cool to find a mid-1990's example and transplant an OM 606.964 ERE or OM 606.962 ERE 6 cylinder turbocharged diesel with a 5-speed. That sounds cool, right?

Just for fun I started going out and test driving some G-Wagons for sale. Not that I was going to buy anything but just to do research for a future purchase. I drove a 1991 300E, a 2005 Supercharged G500 AMG and a few other less memorable G-Wagons. By the way, the supercharged AMG is sick fast. Something just felt wrong going 0-60 in 5.4 seconds in something that felt like a tank. The 300GE was surprisingly quick and responsive. Fun times!

Then it happened, somebody drove a 1990 W461, Puch Austrian Military 300GD into town and was selling it. The owner was on vacation, but with the owner's permission my friend and I drove over to look it over.

The truck was soo cool. It was a 300GD, LWB, Cabrio, 4-speed manual with a naturally aspirated OM614. On top of that, it had jump seats for eight bringing the total to 10 passengers including the driver! We tried to start it but it was DEAD! The issue was the 24v electrical system could not be simply jump-started with one car.

We decided to drive our Jeeps over and use two cars to jump-start the beast. It cranked up and was very rough. My immediate thinking was it needed glow plug work or the diesel pre-chambers had carbon build up because after it warmed up, it drove pretty well.

The front end exhibited no noise, there were a few small rust bubbles at the bottom of the wheel wells and on the windshield, an engine oil leak, and seepage from the front differential and the transfer case. All pretty normal stuff. The soft top was in pretty good shape, some clouding, and one cracked window but all was very serviceable. The front headlights and the heater blower did not work.

So in a moment of weakness, I made an offer and bought it. The engine leak turned out to be a loose oil drain plug, a quick reaming of the prechambers and diesel purge solved the rough start issue. Headlights turned out to be blown low beam bulbs and as it turns out it even holds a charge. This could be a daily driver!

My current plans are to give it a good once over mechanically and have the minor rust issues resolved before they get out of control. Driving it around I get a lot of: "What is that?" and "Where did you get that?" and "Can I get a photo?" I have not decided what to do long-term, but you will hear about it here. How does it drive? Well.. lets just say it is a lot more spartan and just bit slower than the 2005 AMG! Can you say "Ari Safari?"

October 12, 2015

Fuel Tank Repair or Replace?

I noticed some fluid from the back of my car in late August of 2015. A quick whiff and I discovered it was diesel fuel. DANG! This is the summer of front-end repair, a new starter, and now a leak in my fuel line.

A few days later I decided to take a quick look and the fuel was leaking from where the folks who did the conversion from gas to diesel took the fuel pump out. There was an extra filter and an adaptor. EASY - WRONG! It looked like the fuel was coming from the top of the tank and dripping down. It could be the rubber hose but I decided to remove the tank and make sure.

Here is what I did:
  1. Run my truck to almost empty.
  2. Disconnect my battery (no power, no sparks, no boom)
  3. Removed the rear mat to get to the floor.
  4. Removed the four philips screws that go to the square panel in the middle and remove the plate. 
  5. You will see a plug with three wires going to the tank, remove the plug. (If you like you can remove this unit and pump your fuel out at this point)
  6. Also, remove the breather hose that goes to the top of the tank.
  7. My truck features the extra two tanks in the side pillars so I jacked up the car, removed the clamps from the large hose that goes to the lower tank and disconnected the hoses. You will need to squeeze them to get them off. Then lower the car back down. 
  8. Then I removed the lower hose that feeds the fuel system and drained the tank into a diesel container. (Note this will not remove all the fuel)
  9. I then removed the return fuel line at the top of the tank.
  10. I then placed a hydraulic jack under the skid pan and jacked it up just enough to hold the tank in place. 
  11. Two metal straps are all that hold the tank, so simply remove the 13mm nuts and remove the straps. 
  12. Now slowly lower your jack and the tank will start coming out back first. Watch out not to spill the remaining gallon of fuel.


Rust on Bottom of Old Tank
With the tank out, I noticed the skid plate for the fuel tank was rusted BAD and had started to cause pitting on the bottom of the tank. I did not see any leaks on the tank but did notice a previous patch on the left side. I also noticed where the tank had been dented on each side probably from some serious off-road use!

The skid plate was going to need to be replaced, the tank replaced or at least reconditioned and I would upgrade all the small rubber fuel hoses. Now the fun.

If you have an early model G-Wagon you probably know about the plastic tank conversion. Quick summary: for about $1200 you can purchase a new plastic tank and for $1800 more the kit to install it. The upgrade is a good idea because plastic is better than metal for a BUNCH of reasons. Before we talk about what I decided to do, let me give you some important HARD TO FIND info that will save you money and time.
G-Wagon Fuel Tank
Original Tank From top back
  • The Mercedes part number for the new Plastic Tank for the W460 and W463 is A4604701201.
  • The Mercedes part number for the installation kit is A4614700004.
  • You can get an after-market part for a LOT LESS from a parts supplier in Latvia at: https://plasticautotank.com/ € 539.25 for the tank and does not require a kit. Even with freight of €599.00, it is half of what they sell for in the States!
New Plastic Tank A4614700004
I'm keeping my car so I considered ordering the kit and the tank. Delivered it would still be $1500, but that would mean I could only use one of the extra tanks fitted on my car. The one on the driver's side would not be able to be used. I would have a nice new tank, new fuel sensor, new tubes, new, skid plate and new straps. Pretty much guarantees no more fuel problems for me and my G-Wagon. But I decided to keep looking.

I've got a couple of classic cars and decided to look at fixing the tank and maybe getting a new plate made. I know fellow car enthusiasts who have had major tank work and they look great and work for years.

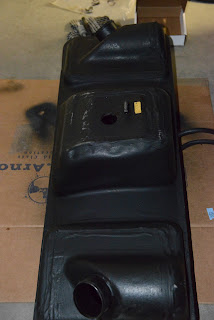
The folks I found locally (State Automotive) use a process called RenuThe tank is cut open, sandblasted inside and out, holes repaired, and sealed with special Renu coatings. They look great and are sealed in a way where they will virtually never rust. The entire process cost just over $500 and in two weeks I had a virtually new tank.


G-Wagon Fuel Tank
Reconditioned Fuel Tank
They pulled out all the dents and with the new finish the tank was tough and solid. Actually, I think it is now better than new and should resist all corrosion. They even said there was a lifetime warranty for as long as I owned the car. The best part, it was an exact fit.

I purchased all new hoses, new clamps and sanded down the straps and applied primer and three coats of paint so the straps would look as good as the tank. I installed the tank without the old rusted skid plate for now and it looks and works great. 

If you are doing this yourself, make sure you keep the inside of the tank clean, don't get the supply and return on your diesel lines reversed and make sure all hoses are well clamped to eliminate the risk of any air getting into the fuel lines. Once installed you may need to use your diesel primer pump to prime the fuel system. 

One more thing to check: After the installation of the new tank, my return lines were seeping at the joints and I was getting a lot of black smoke. I pulled off the return line from the engine and applied some pressure and found the fuel was not going anywhere. The return line was clogged and since the seeping was all the way at the tank, it had to be in the tank. I ran the tank to almost empty, removed the line going to the tank and used a thin flexible wire brush to clear the line. When I first inserted the brush, there was a lot of blockage, but with a little pressure, I was able to clear the line. The car instantly ran better and all of the seeping stopped. 

With the tank reconditioned and installed, it was time to start thinking about the skid plate that covers the bottom of the fuel tank. The skid plate for the metal fuel tank and the plastic tank are different and don't look to be interchangeable. Four by Four Club is the only place I found the old-style plate and it is expensive, like $550. CLICK HERE for the plate for the gas version I believe it will work for the diesel as well, but a quick call to Vlad will verify if it works for the diesel tank. ORC also makes aluminum front and back skid plates for the W460 and W463 G-Wagons but they are designed to work for the new plastic tanks as well. 

I decided to visit a local sheet metal shop, Sheet Metal Fabricators, and see what they could do. Showing them the rusted rear skid plate they said they could fabricate one for less than $400. He could not reproduce the grooves but otherwise, it would work perfectly. I asked if they could make it from aluminum and they said it would not cost much more. Lead time: two months. When complete, I'll have it powder-coated red just for fun and it will be as nice as the ORC versions. 

Stand by for results.    


July 31, 2015

Whining Front-End

I don't do a lot of highway driving, and since it is pretty cool, almost never with the windows down. But early in the summer of 2015, I was on a classic auto excursion with a friend looking at T-Birds and noticed that when I was driving along a wall, there was a horrible metal on metal scraping sound from the front end of the car. NOT GOOD! When I got home I started looking at the front end. 

I jacked up the car and sure enough turning the wheels gave that scraping sound. I ordered the Front Axle Service Kit from Euro Truck. I took the truck to two independent shops with the instructions and neither wanted to do the rebuild. I finally gave up and took it to my local Mercedes-Benz Dealer in Salt Lake City and the service manager said they could do it!. I knew it would cost more, but I was ready to get this fixed. 

The next day the service manager at the Dealer said they could not fix it because of pitting on the large steering balls, it would just not work. They offered to sell me a new axle for $12,000. Right! I picked up my car. 

I asked around and found a shop called Gears Transmission and Drivetrain Repair that specializes in 4x4 repairs. I called and they sounded confident they could do the work. 

I dropped off the truck and the rebuild kit and they called the next day. There was excessive wear on the right axle and al little less on the right. OK, no problem, let me get the part. 

I called Sean at Eurotruck and he said it was not something he usually has, but he would make some calls. A week later he said there were none to be found, but Mercedes would call the factory that made them and have some made. They would be about $1100 each. I'm planning to keep the truck so I ordered them. Now Sean carries the parts and you can see them HERE.  

About a month later they came in and a week later the folks at Gears had my truck ready. The labor was about $1300. So for about $4000 total I got new axel shafts, differential cover, pinion seal, boots, CV joints, bushings, wheel bearings, kingpin, kingpin seal, steering ball seals and gaskets. It sounds a LOT better and runs much smoother. Also fixed is the seeping of differential fluid from the wheels near the steering balls. There is still a little sound from the differential but that will have to wait for another day. 

Now when folks ask me about maintenance of my super cool car I say, "Most repairs are pretty easy and inexpensive, Except the front end!"  

March 3, 2015

G-Wagon LED Headlights

The original headlights in the 80's era G-Wagons are pretty pitiful by today's standards. The best headlight technology of the time was halogen bulbs. Don't get me wrong, I am old enough to remember the old incandescent sealed beam headlights and the halogen bulbs were a huge improvement. It is just today we have HID and LED. 

HID was go to lighting system for luxury cars until recently. LED has taken over. 

High Intensity Discharge or HID are those bulbs that take a while to reach full power. They use an arc to excite an inert gas to make light. They are a huge improvement over Halogen because they are more efficient and produce whiter light but over time they tend to change color and loose some of their intensity. 

Light Emitting Diode or LED lights have been around since the 80's but only recent advancements have allowed them to be used as a light source. The are available in a wide spectrum of colors (see what I did there?), use less power and last longer than HID, halogen or incandescent systems. 

HID systems are effective, can be expensive but the biggest issues is they are complicated to retrofit into the G-Wagon. I got an HID kit and sent it back after reading the instructions and I majored in electrical engineering. So I started to consider LED as an option. Most folks think that if you want LED headlights you will need to replace the entire assembly. I tired one, it was expensive, did not look that great and was not all that bright. BUT THERE IS A BETTER WAY!


It took some time but I found a bulb that can replace the standard halogen bulb in the existing housing. It requires no special electrical knowledge and is basically plug and play. Or rather plug and drive. There are several out there, but I choose the GP Power 6400LM kit. As of press time they are less than $30.00 on Amazon.

If you are an owner of a military version of the G like a Puch or Wolf, then make sure you use a LED solution that supports 24V. Some LED solutions support a range of power from 8V to 27V. I' can confirm the GP Solutions 6400LM does work on a Puch 300GD at 24V.

If you know how to change bulbs just stop reading, order them and install them. They pretty much just fit. If not, read on...

First removed the rubber or plastic bezel around the lights. Just unscrew the single set screw at the bottom, gently pull the bezel out at the bottom and slide up. It will just come off. Once removed, you will see a metal ring holding the light in place. There are 6 screws on the ring three hold it in place and three are for adjusting the light. Remove the three screws indicated by the arrows.  
Careful the light will come out toward you. Unplug the socket from the back and if you are lucky enough to have the EURO version unplug the parking T10 light at the bottom. If you have a sealed beam headlight, you are screwed. You will need to upgrade to a Hella 002395991 7" H4 Light  a removable bulb.

Take the housing over to a workbench or table. Remove the rubber trim from the back to reveal the spring loaded wires that hold the H4 halogen bulb into place. Push the pins down and squeeze them together so they come up and hinge back out of the way. Then simply remove the H4 bulb.


Now take one of the LED bulbs and install it into the housing. The bulb will only fit one way, make sure to line up the three tabs properly. The fit is TIGHT so take your time and gently pry the metal housing out if necessary. You may want to put a little silicon bead on the housing prior to installing the light to keep water out.

Once installed the housing with the new LED H4 headlight will look something like this. NOTE: Don't try and install the rubber water guard you removed above. 

You may want to take this opportunity to replace the parking light with a T10 LED so it will have the same color. Once complete take the new headlight back to the car and install it in the housing. Make sure the headlight fits into the three tabs on the housing. Put the ring around the light (the DOT stamp goes on top) and install the three screws. Test your lights before putting the black trim back on. Adjust the beam using the other screws around the headlight as necessary, mine had to come down a bit. 

Once complete, they worked perfectly with a slightly wider pattern on low beam, whiter light, more distance on high beam. One bonus, on high beam the low beam lights still work. They are so intense, you may find you no longer need the fog lights. All this for about $30 and 20 minutes of time. 


February 28, 2015

The Fifteen Dollar Diesel Tune-up

With over 150,000 miles on the 30 year old OM617A turbo diesel, there has to be some build up in the fuel system. Many Mercedes diesel owners have spent countless days tweaking the performance of their engines and many talk about the benefits of a diesel flush. It looked easy and inexpensive (two of my favorite things) so thought I would give it a try. The entire process took less than an hour, gave me more power, smoother running engine, less valve noise and a more responsive engine. 

Some folks advocate removing the injectors and cleaning or replacing them rather than the Diesel Purge. Here is my thinking: The purge will not fix a clogged injector, nor will it clean as well as removing them and cleaning them. But even if you do clean or replace the injectors, there is still carbon build up in the prechambers and fuel delivery system. This will clear the ENTIRE fuel system and unless you are doing a rebuild, a diesel purge is a great option. 


The product I used is called Liqui Moly Diesel Purge available from just about auto shop or you can order it from Amazon for about $15 and easy to find for even less. If you are comfortable under the hood and understand fuel systems, skip the rest of this blog and follow the instructions in the video to your right. Warning it is a little bit of an ad, but does provide good information. 

If your under the hood skills are limited to checking and topping off the oil, I've got step by step instructions that will work on just about any diesel engine. I'm using the OM617A that is in my 300GD for an example. 

A little background first. The diesel fuel is pumped from your tank, through a filter (maybe 2), through a throttle that modulates the amount of fuel, then eventually to the injectors that feed it into each cylinder. Now the injectors can't use all the fuel so some is fed back into the fuel tank. So the entire system is kind of like a loop with the engine sipping off what it needs. 
OM617 Fuel Lines
Here is a quick summary of what we will be doing:
  1. Disconnect the fuel line going into the filter - this is where the Diesel Purge needs to go into the system.
  2. Disconnect the fuel return line going back to the tank - this will need to be fed back into the Diesel Purge bottle. 
  3. Take the line you disconnected in step one (the one that came from the tank and fed into the filter) and plug it into the line going back to the fuel tank. This will keep the lines from getting air and the pump from spilling fuel all over the place while you purge the system. 
Before you begin you will need:
  1. A can or two of Diesel Purge
  2. A 10" tube of rubber fuel line hose
  3. A clear plastic bottle - large enough to hold all the product.
NOTE: During the process you don't what to run the engine while there is no fuel going into the system or you will need to prime the fuel system to get the air out. 

I also suggest warming up the engine before starting this process. Things just seem to clean better when they are warm, right? 

When disconnecting the fuel lines you will have to loosen the clamps with a screw driver or clamp remover. No need to tighten them during the purge but remember to tighten them back up when you put everything back together. 

Lets start by removing the line coming back from the injectors. In the OM617 the return line comes from the injector closest to the front of the engine and runs to the top of the filter. From there it feeds back to the tank. Remove the hose that feeds the tube going to the tank so that you have about a foot or so of hose hanging loose. I like to point the hose up to reduce the amount of fuel that will leak out.  
Return Fuel Line Removed
Then disconnect the line going into the primary filter. This line is coming from the fuel tank and supplies the diesel fuel to the system. If this primary filter is not present you should install one. In cold climates, this filter will become clogged first when it gets cold with the waxy diesel and is easy to change. 
Primary Fuel Filter Line
Then connect it to the return line going back to the tank. You will still have the return line you disconnected before sticking up in the air. This is important because when you start the engine a fuel pump will pump fuel from the tank. By hooking it back to the return, it will simply be pumped back into the tank and not spill all over your garage.

You can feed those tubes directly into the can of Diesel Purge but the metal bottle makes it hard to see how much purge is left. By using a clear bottle or glass jar, you can see how much purge is left and cur off the engine prior to in running out. This keeps air out of the system.  

If you use a plastic water bottle, make sure is is DRY and clean. Then cut a hole in the top and feed the return line coming from the injectors into the bottle. Then take the 10" extra fuel line you purchased and connect to the small filter to supply the engine. Make sure the second line going to the filter stays submerged and rests in the bottom of the bottle. The return does not need to be inserted to far into the bottle. Wedge the bottle in a safe place so it stands up. 

Once everything is hooked up, turn on the engine and let it idle for a while. Once you are sure it is working, increase the throttle from under the hood and run the purge through the system at a verity of RPMs. If you are using a clear bottle, you may notice it getting a little dirty. That is the carbon build being removed up BEFORE the injectors, just think of what is being cleaned from the injectors and the pre-chamber!

Purge System in Place
As the bottle becomes empty, shut off the engine remove the return tube and use a funnel fill the bottle with more purge. If you have not done this before, use two full bottles of product. The entire process takes about 10 minutes per bottle. 

Remember to stop the process before the product runs out. I play it safe and shut off the engine with about a 1/4 inch of purge left in the bottle. 

When you are done, reconnect all the fuel lines as they were connected before and test you engine. It is a good idea to change at least the primary fuel filter now as it will have collected some carbon residue. Go for a test drive now and you will notice less smoke, smoother running engine, more power better cold starts and a quieter idling engine. All of this for $15 and about an hour of shop work.  

As you can see this process is pretty easy. I'm planning on doing this about every 12 or 18 months just to keep the engine in good shape. 

February 5, 2015

Mercedes Transmission Experts - Sun Valley Mercedes Transmissions

When I purchased my G-Wagon, it came with a large cache of documents detailing the service history of the vehicle. Included was a December 2008 invoice for a rebuilt transmission from Sun Valley Mercedes Transmissions. When I started having transmission issues, I looked the shop up on the internet, found the web site and was not very impressed. After exhaustive troubleshooting and help from a local shop I came to the conclusion that the transmission needed work. Before having it rebuilt locally I decided, at the last minute, to reach out to Sun Valley and get their take on the situation. 

Sound City
Sun Valley Mercedes Transmissions
I'm glad I did.

Sun Valley Mercedes Transmissions is located not far from where my daughter Ally works. All they do is rebuild Mercedes transmissions. After a short call with Marc, I decided it would be best to have the transmission pulled and take it to them on my next trip to visit Ally in LA.

When I arrived I was impressed. First of all, I was surprised to see the shop was next door to the famed Sound City recording studio where Fleetwood Mac, Tom Petty and Nirvana all recorded. That studio really is the source of the best sounding drum recordings from the 70's, 80's and 90's. After the shock of standing next to the legendary studio passed, I was given a tour of the facility by Marc. 

I was impressed with what I saw. Inside was an efficient, well stocked and organized environment filled with just about any Mercedes-Benz automatic transmission you could imagine. From the first units made in the late 60's to the modern 7-speed computer controlled systems. It was great to find a specialist that ONLY works on Mercedes-Benz transmissions. 

Marc showed me how they disassemble each transmission, check the components, machine and replace as necessary, upgrade when needed, reassemble and test. The shop even has the ability to program the newer 7-speed computer controlled transmission computers. I was beginning to think the transmission would actually be better after the rebuild than when it left the factory!

Mercedes-Benz Transmission Testing Rig
After the work is done, they have two in-house made systems where they mount the transmission for testing. Each features a different Mercedes-Benz engine. One of the rigs had an OM617 Turbo - just like the one in my G-Wagon. BONUS!

While they can sell transmissions with a core replacement, Marc told me he prefers to rebuild your transmission. After the tour, I felt very comfortable leaving my transmission with Marc and his team for repair. He said it would be ready in about 3 days AND IT WAS!

Even though the transmission was 5 years out of warranty, Marc and his team fixed it at a substantial discount. I came away very happy with the experience and confident I was not going to have trouble with this transmission again. 

If you are in Southern California and need transmission work done on your Mercedes-Benz, this is the place. If you live outside the SoCal area, give Marc a call and consider sending him your transmission for a rebuild. They are fast, affordable and from what I can see do excellent work. Don't let the crummy web site fool you, these guys are experts. 

While you are there, take some time to take in Sound City vibe. Soundtrack: Reannan, Free Falling, Smells Like Teen Spirit...

January 29, 2015

Interior Update: G-Wagon Center Console

Anyone with an older G-Wagon has experienced a center console with holes and cracks. Seems over time, various switches and modifications have been added and removed to many consoles so there are small holes, screw mounts and missing parts. This was the case with my G-Wagon but there was another problem. The center air conditioning unit had been removed leaving the rear of the center console where it was cut looking pretty shabby. 

I thought about getting a new console, but the price was well over $600. I decided covering it with vinyl like the rest of the car would look better and be less expensive. 
Repaired Underside of W460 Console

I asked Ben at Brent's Custom Upholstery to try. He said it would be pricy and take some time, but he would see what he could do. He started by patching the holes and performed a miracle by using ABS plastic to fix the cut out portion so it had the shape prior to the trimming to accommodate the air conditioning console. 

He then covered the console with padding and finished it off with stitched vinyl that had a nice leather look that matched the seats and doors. I opted for black to keep the feel of the original console. One bonus is the new console isolated more noise from the transmission and engine. 

Covered G-Wagon Console

At about $200 this was a better option for me and a huge interior upgrade to the look of the W460 while keeping the original look and design feel.

THANKS BEN!

January 21, 2015

OM 617 Turbo POWER

If you are like me, you have probably never driven a 1984 turbo diesel G-Wagon. They are kind of like Unicorns, we like the idea of them, but they were just never made. Why you ask? First of all, there were no G-Wagons sold in the US in the 80's and secondly the turbo diesel G-Wagon was not even built until the 90's. 
ALDA with Cap In Place

The thing was, the power from the OM617 5 Cylinder Turbo in my car seemed pathetic. Why would anyone want to have this? The term SLUG comes to mind. I was getting 0-60 in something like 30 seconds and forget about a mountain climb at anything near the speed limit. So I started digging for more power. Turns out the first thing I tried, adjusting the ALDA, was just the thing I needed. It was easy and did not take long, required no special tools or instruments and WORKED!


The OM617 Turbo has an ALDA that controls the amount of fuel sent to the engine. The ALDA is a simple mechanical device that that measures altitude of the vehicle and the pressure from the turbo intake manifold pressure to adjust the fuel made available to the engine. I could tell mine had not been adjusted since the engine was assembled at the factory because the cap was still covering the adjustment screw. 

My first step was to make sure the pressure from the intake manifold was reaching the ALDA. I started by removing the nut at the rear of the intake manifold with the banjo connecting to the plastic hose and make sure the airway was clear. It had some build up in the nut and the banjo so I cleaned it with a solvent and replaced it. 

The next step for the pressure from the manifold was a cutoff valve. There is a switch on the top of the intake manifold that measures pressure inside the manifold. Too much pressure and the switch connects to ground and causes a bypass valve to release the pressure before it gets to the ALDA so the turbo will not overload. In my case the wires going to the bypass and manifold switch were disconnected.

Just to make sure, I removed the bypass switch connected the hoses tested it on my bench. It worked perfectly. After checking all the remaining hoses I removed the cap from the top of the ALDA.


ALDA Cap Partially Removed
The top of the cap is plastic so I used a sharp razor blade to cut through the plastic on top and a pair of diagonal cutters to cut the metal along the side ring. This reveled a hex lock nut and the adjustment screw. I kept working at the cap until I could get to the locking nut. By removing the locking nut from the ALDA, I was able to remove the remaining part of the metal ring and plastic.   

Once the cover was removed, I replaced the large washer that was under the nut with the locking nut but did not tighten it all the way. With the nut loose, the screw in the middle was easy to turn. Do not force the screw, it will break! I turned the screw counterclockwise about 1/8 of a turn to increase the fuel flow and took the car for a drive. I tightened to hex hut to hold the screw in place. WOW what a difference. Much better acceleration below 2000 rpm and a HUGE improvement once the turbo kicked in. 


I repeated the steps above and adjusted it one more time and got another increase in acceleration and responsiveness. I was careful not to adjust so far that black smoke came out of the exhaust indicating too much diesel to was being provided for the the engine to burn.

The next step was to get the overload bypass working again. I simply installed the bypass switch and reconnected it to the manifold overload switch. Unlike what some other said, I experienced NO LOSS OF POWER by replacing the properly working pressure release switch. Most importantly the engine is now protected from turbo over boost. Even with the overbuilt nature of the OM617A, too much turbo could damage the engine.  

There is a lot of talk on the internet about whether or not to adjust the ALDA. Some even say you should completely remove the ALDA. Others turn the screw all the way out till it stops. I think my results speak for themselves. The car was a slug prior to the adjustment and now it is downright zippy with 0-60 now less than 22 seconds that is almost a 30% increase in acceleration. My feeling is a 30 year old mechanical device could use some adjustment.

One more note: I also performed a Diesel Purge that provided more of a performance boost. CLICK HERE for detail instructions. 

If anyone wants to drive a 1984 300GD Turbo, just take a short drive to Park City and I'll let you take it for a spin. Because unlike the mythical unicorn, they really exist. Warning: after driving the turbo, you will hunting for an OM617 Turbo to put in your W460!

January 9, 2015

Interior Update: Modified Recaro Seats

Original Tartan W460 Seats
I'm not looking to restore my 1984 300GD. If I were looking to have an original G-Wagon from the 80's, this would not be the car. First of all it was built as a 280GE, now it has an engine from a 1985 300 Turbo and a totally different transmission. On top of that, it was repainted a modern Mercedes Onyx color. I'm looking for a Snow Wagon to be a winter driver here in Park City so a seat upgrade was in order. 

When the 300GD came with two sets of seats, my choice came down to comfort and looks. A set of Recaro racing seats had been installed by a previous owner. He made some custom adaptors that were basically two steel square tubes that ran down each side of the seat. Also included were the original seats with that checkered fabric. They actually looked pretty good but did not even come close to comfort of the Recaro. 
Recaro Racing Seats

The thing is, the Recaro's are racing seats similar to the Recaro Speed series but with larger, and to me very ugly wings on the sides. The Speed Series are designed to accommodate racing restraints that would come over each shoulder and latch between the driver's legs. We may do some off road driving in this car, but there would be no need for racing restraints. Looking them up on Recaro's web site, I could tell the current version of this seat sold for about $900 each. I decided if I could make them look a little less like a racing seat, I would go with the Recaro. The original seats would be bound for an eBay auction!

While I did most of the interior work myself, I was not about to take on the job of upholstery work on the seats. For that I decided to use a local shop in Heber City, UT called Brent's Custom Upholstery. They said they could recover the seats, trim down the wings, remove the plastic rings and fill in the seat restraint holes. They recommended covering the front of the seats with the more durable and breathable leather and use the vinyl for the backs. Turns out this is how most "leather" factory seats are covered. 
Covered Recaro Leather Seats

When covering the old rear seats, I decided to focus on two passenger look rather than three. I had some 1" padding added to add definition to better match the pattern on the front seats and stuck with vinyl to reduce the cost. I asked them to add some ABS plastic to the otherwise metal back of the rear seat and had it covered with HR1307 Harddura. For those not familiar with Harddura, it is a strong vinyl backed with heavy felt that was used as interior floor lining in English cars, mostly Jaguars of 60's and 70's. Since I was planning to use it as the floor covering for the back of the car and under the rear bench seat, it made since to cover the back of the bench seat with the same material.

I already had the lather and matching vinyl so pulled out the Recaro front seats, the back bench seat and installed the original seats so I could continue the rolling restoration. I also dropped off some ceramic heating elements for the front seats to be installed. About 6 weeks later and the seats were done and they looked great. 

The seats are comfortable look fantastic and the rear seats look very much like the W463 seats shipping in the newer G-Wagons. I really like the upscale stitching pattern that Brent's used and it matches the stitching on the doors. While not accurate as an example of a W460, with the interior done, folks can't believe this car was made in 1984. To me it is comfortable to drive and does not deviate much from the original design.  

January 7, 2015

Slipping in 4th - Transmission Trouble?

Last week after I got the oil changed, I noticed the transmission slipping in 4th when climbing hills. I called my local Mercedes guru Brent Groth and asked what he thought it could be. He had this worried sound to his voice and said, "that is not good." I had the transmission oil changed and a new filter fitted in Burbank just about 6 weeks ago so I was a bit worried. 

I see from records that the previous owner provided that he installed a rebuilt 722.109 automatic transmission from Sun Valley Mercedes Transmissions in December of 2008. That is the same transmission that was used in the 300D from 1957-1981. Checking the records of when the car was built using a European VIN Decoder, it looks like the car was originally fitted with a 720.109 4-speed automatic transmission.

Since I need to have the front and back master cylinder boots rebuilt anyway, I decided to have the transmission looked at. I took the car to a place in SLC called Transmission Man (I'm not making that up), gave Ben all the info I had and asked them to take a look at it. He had his folks look the car over and while they are good at what they know, he asked me to come down and go over it with him. 

We started by looking over the vacuum system and tested the Vacuum Modulator with a hand pump and gauge. With our setup, it would not hold pressure indicating a ruptured diaphragm. The "red" Vacuum Modulator used in the 722.1xx transmissions seems to be hard to find, but we found one at Ecklers and ordered it. 


Once the new Vacuum Modulator arrived, I removed the old modulator and about a quart of transmission fluid drained out from the hole. Once the modulator was out, I pressure tested it again and it held pressure perfectly. My guess was the test rig performed by Ben and me had a leak. Since I had a new modulator, I pulled the pin from the old modulator and adjusted it to have approximately the same length. 

Once the new modulator was in place and I added back the quart of transmission fluid, I used the supplied key to adjust the shift points. Note: The correct way to adjust the modulator is to measure the pressure from the transmission pressure port just next to the modulator, but I did not have the equipment to do that.

I then noticed the vacuum modulator was connected to the VCV vent valve. The VCV vent should vent into the car cabin and not be connected to the modulator. I installed a new T to the hose at the top of the VCV and connected it to the Vacuum Modulator. I purchased an OTC 5613 Vacuum/Pressure Gauge Kit and tested the vacuum coming from the top of the VCV and it was within spec at 15 in Hg and dropped to 0 in Hg at full throttle. 

The result, shifting much smoother but still slipping in 4th. With all of the pressure points going to the transmission good, I've done all I can do without pulling the transmission.
Ready to Travel to LA

I put in a call to Sun Valley Mercedes Transmissions and Marc said he knew exactly what the problem was. Apparently, there is a valve in the transmission that dramatically reduces the pressure when the transmission shifts to 4th. His guess was valve needs to be replaced and said because it has been slipping that a rebuild is probably in order. Brent at Transmission Man in SLC said he could rebuild it but since I'm going to LA this week thought it would be best to let a Mercedes Transmission expert do the work. Brent pulled the transmission and loaded it in the back of my car for the trip to LA.

My Rebuilt 722.109 Transmission
When I dropped off the transmission at Sun Valley Mercedes Transmissions, Marc said he had never had a transmission he rebuilt come back before. He took a look and as he suspected the valve and spring needed to be replaced. After about three days, I came to see him test the transmission. They basically rebuilt it again, cleaned it up, gave me the correct dipstick, washers for the banjo on the dipstick tube and a new Bowden cable. I had to admit the transmission they loaded up in my car looked new. All this for a very fair price!

I loaded the transmission back into my car on my next trip to Park City where the folks at Transmission Man put it back into the car. The guys at the shop did not really know how to adjust the modulator or Bowden cable, but the process of testing the vacuum and throttle taught me how to perform the adjustments. 

Once I adjusted the vacuum modulator and Bowden cable, all is well again. Well except, I'm out about $1000.